Showing posts with label scenery. Show all posts

Sunday, 17 July 2016

New barrier signs

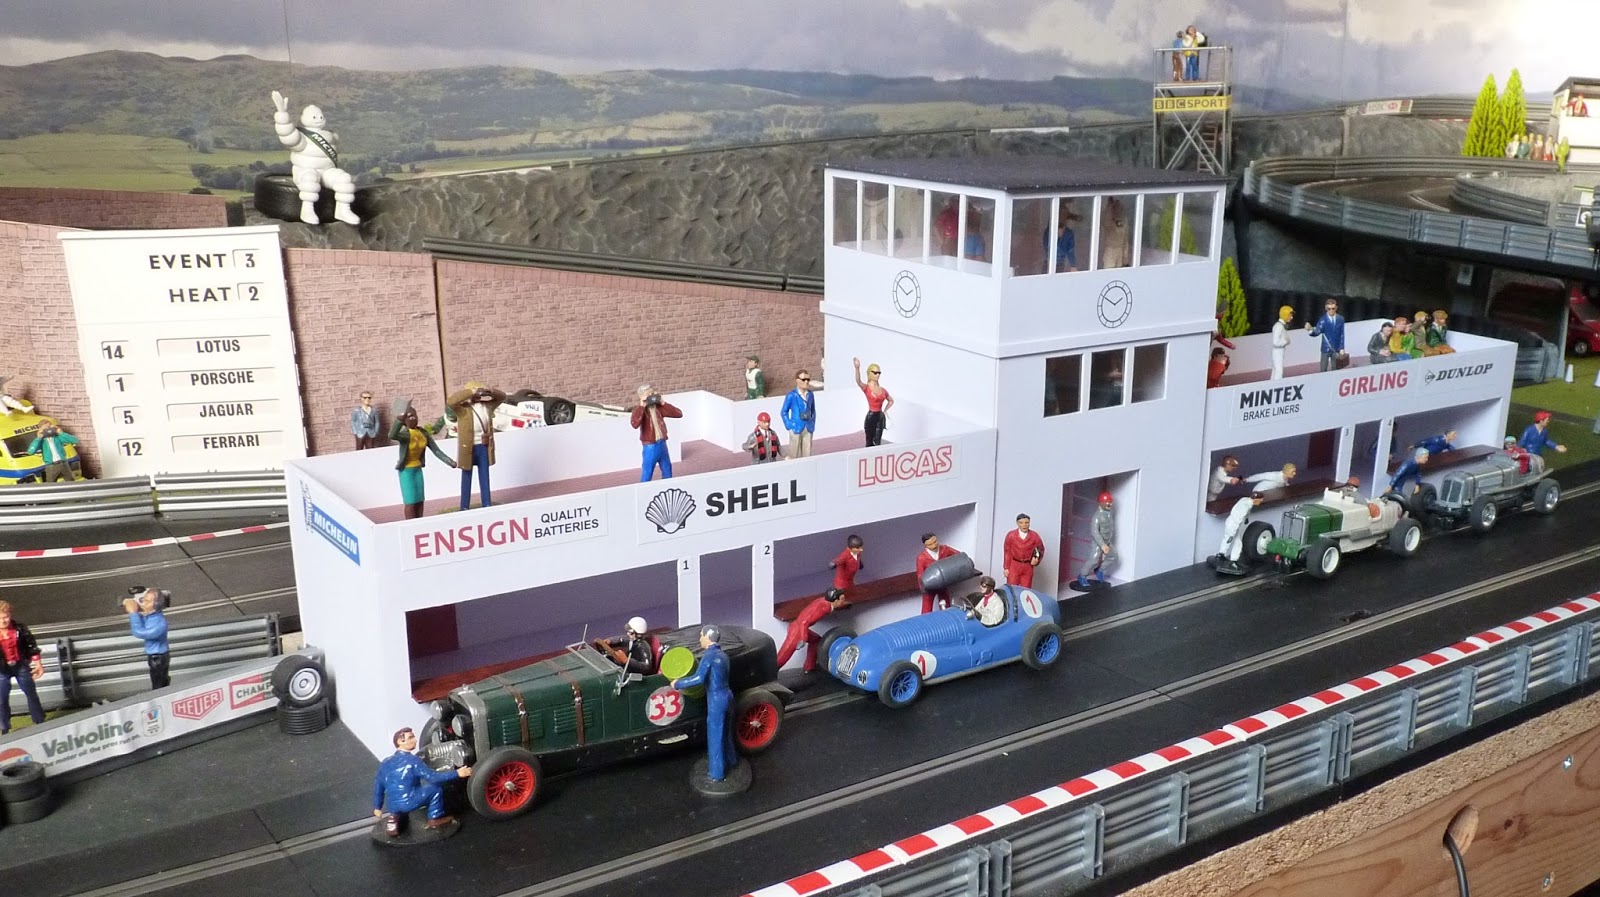
The barrier signs I've used for several years are quite modern, like in this old photos of the pit building:


But I wanted simpler bolder signs like in the vintage Scalextric sets:


The current ones are printed on self-adhesive paper, having upgraded from printing on paper and gluing them on.  Self-adhesive was easier, but didn't stay on any longer, eventually drying up and coming loose.

So I thought I'd try printing on self-adhesive gloss vinyl, which is used for making home-made stickers.  The first attempt didn't go well:


I then found some self-adhesive gloss vinyl sheets which are coated with a layer which allows inkjet printing, and unsurprisingly got a much better result.


These have come out really well and stand out much better on the layout.  Fingers crossed that the self-adhesive is stronger too.


Monday, 6 June 2016

Refreshes the parts other hobbies cannot reach

One of the few vintage Scalextric buildings absent from my layout is the refreshments kiosk (item A228).  They are occasionally seen complete on eBay but for quite high prices.  I picked up a bag of bits at the recent Slot Car Festival that provided a starting point for making my own.


This had some of the right parts - but the tea urn was missing, the cake stands had no picture backing, and the base building was a pit building not the kiosk.  I quickly found a missing tea urn and extra cake stand on eBay, and scanned and printed a copy of the picture backing on the latter.  I also scanned the tatty insert and reprinted onto new card, and printed the right stickers for the building to disguise its pit building origins.  The result is this;


You can see the insert and backing for the cake stands more clearly here:


The original kiosk has a flag with Scalextric printed on it.  I didn't want to replicate that: I know my layout is only a model but I don't think it should be that obvious!  So it got a Refreshments flag in the same style.  And I managed to just squeeze it onto the layout by moving one of the TV camera towers to a new location.


Friday, 8 January 2016

Brooklands-inspired pit buildings and control tower

Over Christmas, I finished the other buildings for Andy to complement the Goodwood Pits I made him in November.  Sticking with the 1930s theme of Andy's track, this time I also looked to Brooklands for inspiration - from the pitlane garages with spectators above like this...


...and this one at Goodwood...


But for the control tower, the inspiration came from the central block of the old aero control tower at Brooklands...


A combination of foamboard, mounting board, clear plastic for windows, and lots of logos and textures printed on to adhesive paper, plus quite a few hours, finally produced this:


It's really three buildings so the two pit buildings could be placed together with the control tower elsewhere on the layout.  (Note that it's only temporarily on my track for the photos).


Here's a close-up of the control tower, with the style of doors and clock taken from the Brooklands building:


The roof lifts off so that figures can be placed inside...


...and then the second floor lifts off to do the same on the first floor...


Finally, here's a view of the rear of the building with the stairs for the spectators to reach the roof:


Soon to be installed on Andy's track, this is a Limited Edition of One!

Before putting my own pit building back, I replaced the old red cardboard garage doors with silver-painted corrugated plastic, and sprayed the grey Jersey-wall concrete barriers alternately red and white.  So it's gone from this:


...to this:


Saturday, 26 December 2015

Insert coin

In Malta a couple of months ago, I came across some wooden fridge magnets in the shape of the classic British phone box.  They had an opening door, a metal phone inside and were just the right scale for Scalextric.  I bought three and, since they were unpainted, the first thing I did was spray them with grey primer.


They were then sprayed gloss red, the handles painted silver and stickers added for the crown and Telephone sign.  Here's the finished product with a vintage policeman I recently found on eBay.


Sunday, 29 November 2015

Goodwood Pits

Andy has added a routed pit complex to his 1930s digital layout and I offered to make him some buildings for Christmas.  The first of these is inspired by the early Goodwood pit structures, as in this image of Jack Dunfee and Woolf Barnato at Brooklands in 1929:


Raw materials were lengths of 5mm square spruce, some corrugated plastic sheets and a piece of metal wire sheet.


I made up frames for the pit structure and an accompanying paddock:


The frames were sprayed white and then fitted with roofs painted a mid-green.  I made up some vintage adverts to fix to the metal fencing.


They made it on to Andy's layout in time for a big digital race meeting yesterday.


Sunday, 18 January 2015

Repositioning the Big Screen

 A couple of years ago, I modified a digital photo frame to act as a big screen on the layout.


The location looked good but it's always partially obscured the far corner.  This weekend I finally got round to moving it to the background.


I removed the screen and replaced it with a marshal's hit, and fitted the screen to a new stand.


I also added a Big Red Button (TM) for starting the races.


Sunday, 13 July 2014

New Start Finish gantry

The existing start finish gantry was a vintage Scalextric item with start lights fitted underneath.


The problem was its fragility.  It would regularly get knocked by a car and the start-finish banner would fall out, or the start lights would slide down the metal poles.

At the recent Slot Car Festival, I found a more sturdy laser cut gantry from MHS Model Products.  This comes flat packed and needs a knife to cut away the places where it is connected before being pressed out.


I constructed the gantry, sprayed it white, and fixed the chequered flags and START / FINISH signs, once I'd painted them also.  Before glueing the side structures, I cut a couple of slots so that the LED lighting panel could be inserted and removed.


Installed on the track, this should hopefully be more robust and resist the inevitable crashes when racers are going for that fastest lap.


Saturday, 21 December 2013

Scalextric-scale Motorbikes

I've blogged before about motorbike models that work on slot tracks.  They are inevitably a larger-scale than the cars and so look out of place if left on the layout.  I found on eBay some 1:32 scale motorbikes for a couple of quid each that, although they don't run on the track, do look good as part of the scenery on the layout.


I bought the models to match the Scalextric MotoGP bikes I have.  Nicky Hayden's Repsol Honda (right hand side) is a perfect clone.  The colour schemes of the bikes on the left are a reasonable match, even though they aren't exactly the same bike.  Amazing models for the price.


Saturday, 31 August 2013

Take the scenic route (part two)

I sprayed and dry-brushed the rock walls and re-installed all the pieces today.


A big improvement on the temporary grass paper solution.


I also recently finished off a few more figures, some drivers and pitcrew - with an important message for racers approaching the last corner ;-)


...and some more spectators and another programme seller.


I still have a dozen unpainted figures but only a little bit of space left now on the layout.  I'll squeeze them in somewhere and then stop.  Possibly.

Monday, 26 August 2013

Take the scenic route (part one)

The far side of the track has various elevations and constructing scenery around the different levels was always going to be complicated.  So I cheated with a roll of grass which I just used to cover the gaps:


It's been like this for a couple of years although I did replace some of the grass paper when I built the big screen, but the rock wall wasn't very convincing.


So my Bank Holiday project was to build some proper rock walls using some pieces of insulation foam I liberated from a neighbour's skip over a year ago (I knew it would come in handy eventually...).


It's a nice material to work with, much easier than the chicken wire and plaster method I used for other parts of the track.  I used a normal saw to roughly cut the pieces and then shaped and added detail with a dremel (rotary hand-tool).  It does make one hell of a mess though.  And I lost count of the trips between the garage and the loft today.


But the end result is a significant improvement.  This is the first piece I did between the two hairpins:


And then I got carried away and ripped out the paper mache rocks I'd created behind the big screen, and shaped pieces for the whole stretch.  As the rock wall acts as a natural barrier, I was able to remove a lot of the armco barriers.


Next job is to paint it and to re-grass & re-plant around the big screen.

Thursday, 3 January 2013

Event Board

I recently bought a couple of unopened Airfix kits from the 1960s of a Time Keeper's Hut and an Event Board (original price 2/- and 3/- respectively).


I constructed and painted up the hut, and took the option of mounting the event board on the roof.  The board comes with a set of cards with car manufacturers and numbers on them.


I've installed this next to the Start-Finish point where the 1960s control tower once stood:


...and included a time-keeper / commentator figure:


...and also installed some lights:


The control tower was moved to replace the cardboard Scalextric control tower (always too modern for the track and the style didn't match):


...and installed lights in that too: